CHAIR HOW-TO: Manage Paper Status
OVERVIEW
Paper statuses are utilized in two ways.
The first is configuring the statuses. For example, set whether Authors see the Reviews and Meta-Reviews or not when a particular status is enabled for their particular paper.
Additionally, paper status names can be modified and/or new ones can be added.
CMT has five default paper statuses.
They are Awaiting Decision; Accept; Reject; Desk Reject; Revision, Withdrawn.
Most conferences do not need to change these names, however custom paper statuses can be created to accommodate conference needs.
The Accept, Desk Reject and Revisions statuses are all defaulted to show Reviews and Meta-Reviews to the authors. This can also be changed if desired.
The second way is setting the Submission IDs to the correct paper status within your conference phases.
Related: Enable Submissions
CREATE A PAPER STATUS
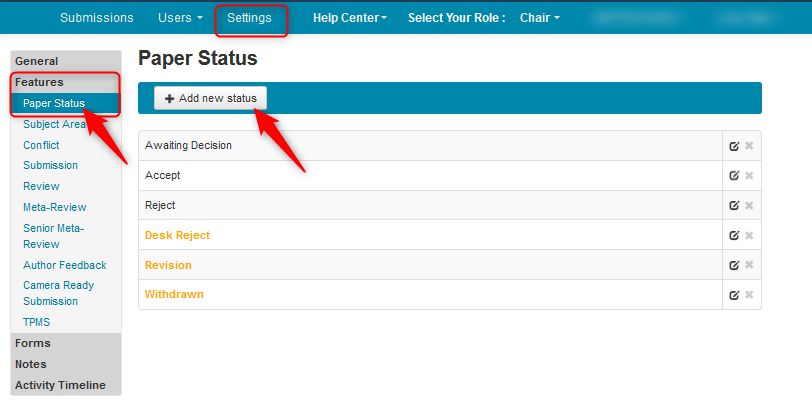
- Go to the Settings tab and select Features>Paper Status. Click the ‘+ Add new status’ button.
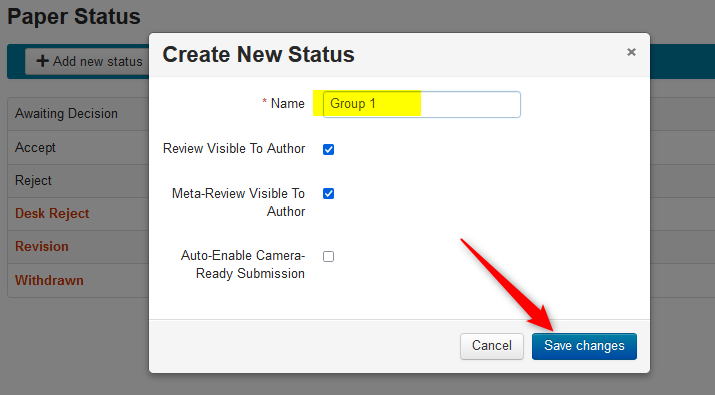
- In the ‘Create New Status’ popup, enter the name of your new status, check if the Reviews and/or Meta-Reviews should be visible to the Author or not, and save the changes. In this example we used ‘Group 1.’
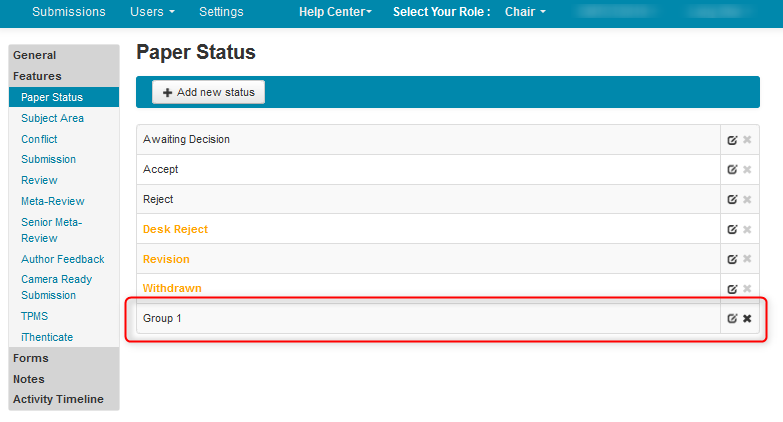
- Verify the new status appears.
EDIT A PAPER STATUS
Caution
Do not change the names of the Paper Statuses that are colored yellow/orange (Desk Reject, Revision, Withdrawn) because they are tied to a certain functionality the ones colored black are not.
Note
Please note there is only ONE REVISION STATUS.
You can create many labels, e.g. Major Revision, Minor Revision, Revised Abstract, but only the one with the colored text is tied to the actual REVISION PROCESS.
This means any other paper status other than the colored Revision status will NOT have a revision upload link.
INHERENT FUNCTIONALITY - DO NOT CHANGE THESE LABELS
Warning
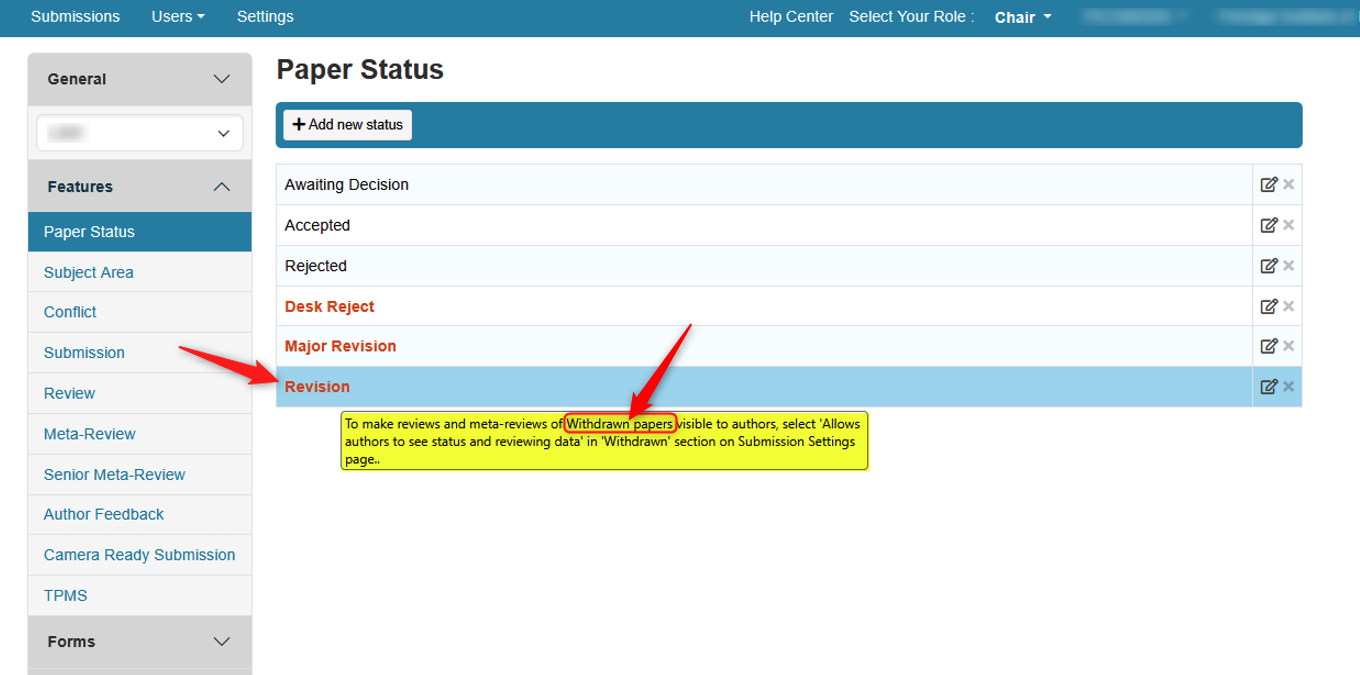
If you change the label of the colored 'Revision' status to 'Major Revision' for example, and then you change the label of the colored 'Withdrawn' status to 'Revision', you will have issues in the Revisoon phase of the conference.
Revision will be treated as a 'Withdrawn' paper - there will be no revision link for authors. You can use the tool tips to see the functionality of each of the three labels.
The 3 functional labels are always in this order:
- Desk Reject
- Revision
- Withdrawn
It cannot be stressed enough to leave the labels of these 3 paper statuses as they are.
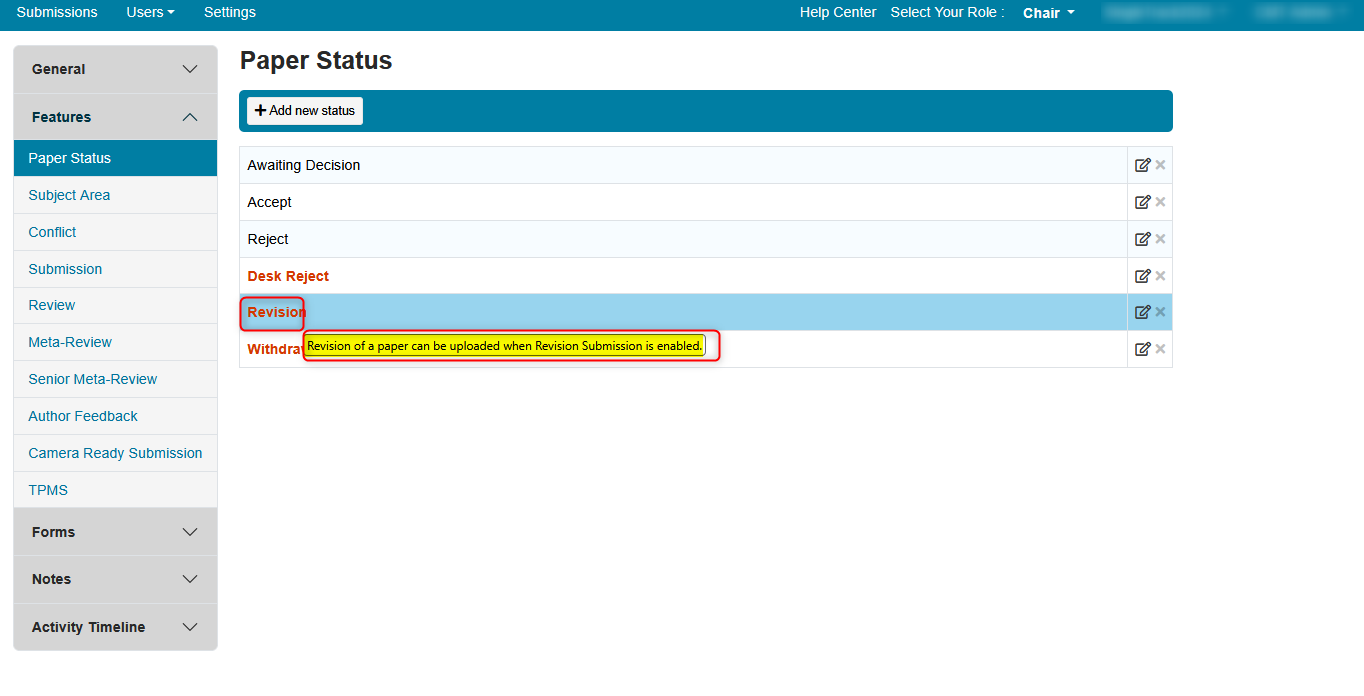
When you hover your mouse over one of the three colored statuses, the tool tip will appear and you can see the functionality of that status.
For example, when you hover over the Revision status you see the functionality is for revision papers.
Note
The tool tips NEVER change even if the label is edited to something else.
If you edit your 'Paper Status' labels like this: change the colored 'Revision' status to 'Major Revision'and change the colored 'Withdrawn' status to 'Revision', then in the Chair Console, set the submission status to 'Revision', it will NOT have the revision link for the author. It will be treated as a withdrawn paper.
THREE WAYS TO EDIT STATUS
There are three ways to edit a paper status:
- The name of an existing status
- Data visibility to the author
- Auto-enabling Camera-ready with the enabling of that respective status
1. Name
- To change the name of an existing Paper Status, go to the Settings tab and select Features>Paper Status. Then click on the edit icon for the status to be modified. For this example we will change the 'Accept' name ot 'Accepted Abstract'.
![]()
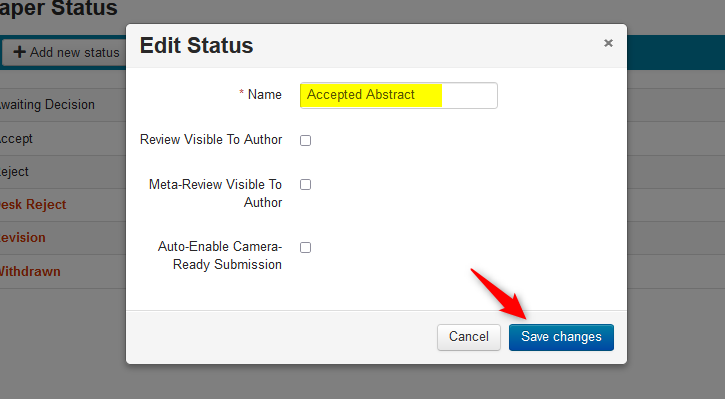
- In the ‘Edit Status’ window, change the name from 'Accept' to 'Accepted Abstract' and save the changes.
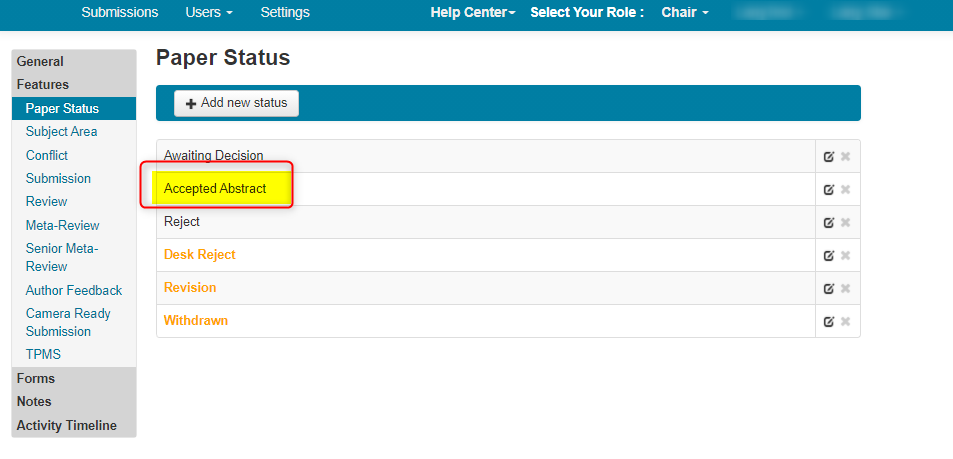
- Verify the name was changed
2. Data Visibility to Author
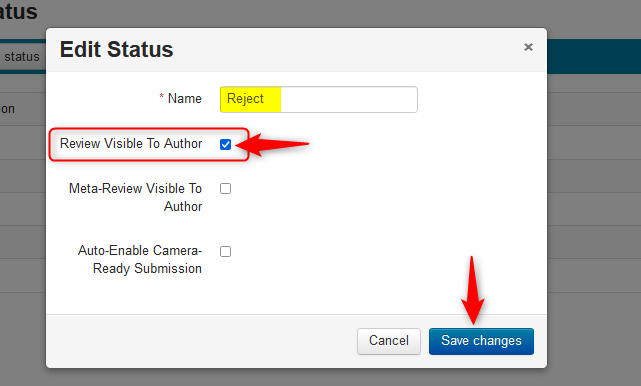
- For this example, we will edit the Reject status to enable ‘Review Visible to Authors.’
Go to the Settings tab and select Features>Paper Status.
To edit the paper status, click on the edit icon.
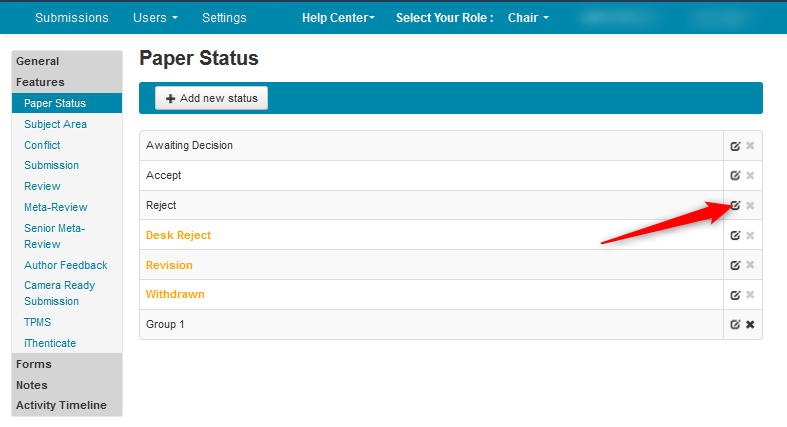
- In the ‘Edit Status’ window, check the box, ‘Review Visible to Authors,’ and save the changes.
3. Auto-Enabling Camera-Ready
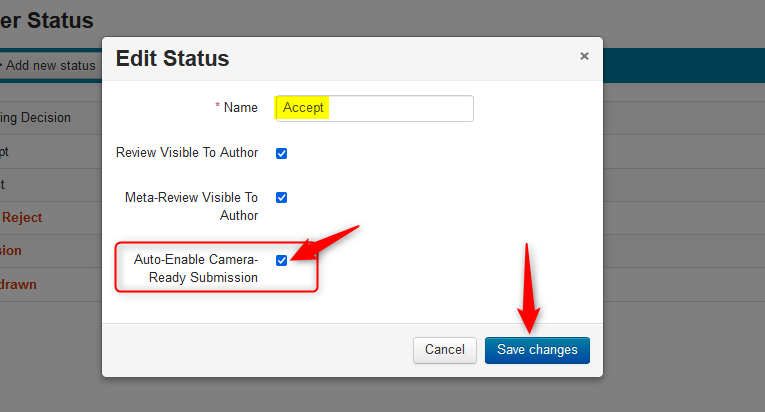
- In this example we will enable 'Auto-Enable Camera-Ready Submission' for the 'Accept' status.
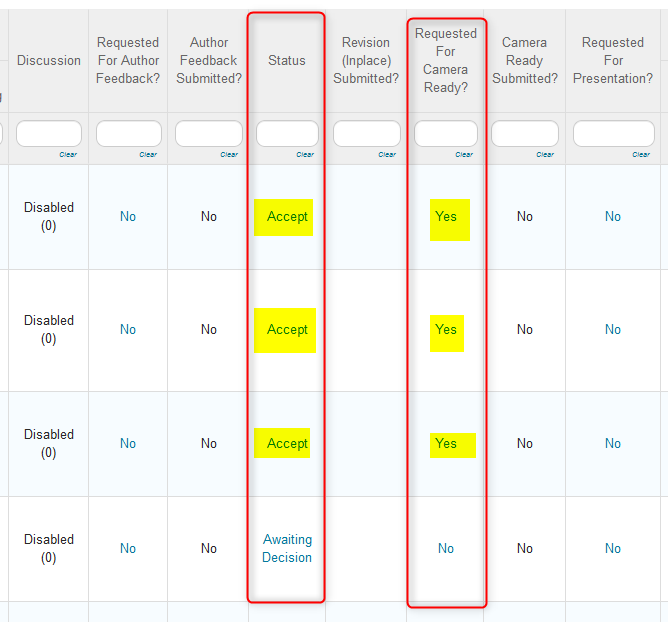
What this will do is automatically enable the 'Requested for Camera Ready?' column in the Chair Console as 'YES' for that paper.
When switching a paper's status to 'Accept,' the Chair Console would then show 'Requested for Camera Ready?' column as YES:
SET SUBMISSION ID PAPER STATUS (INDIVIDUALLY)
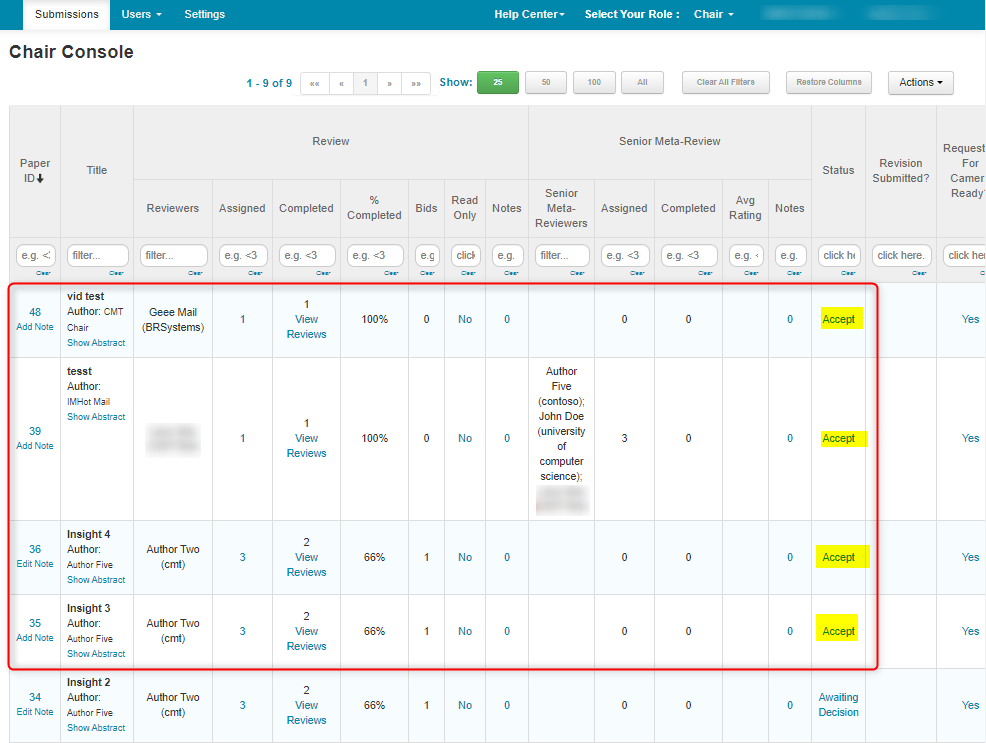
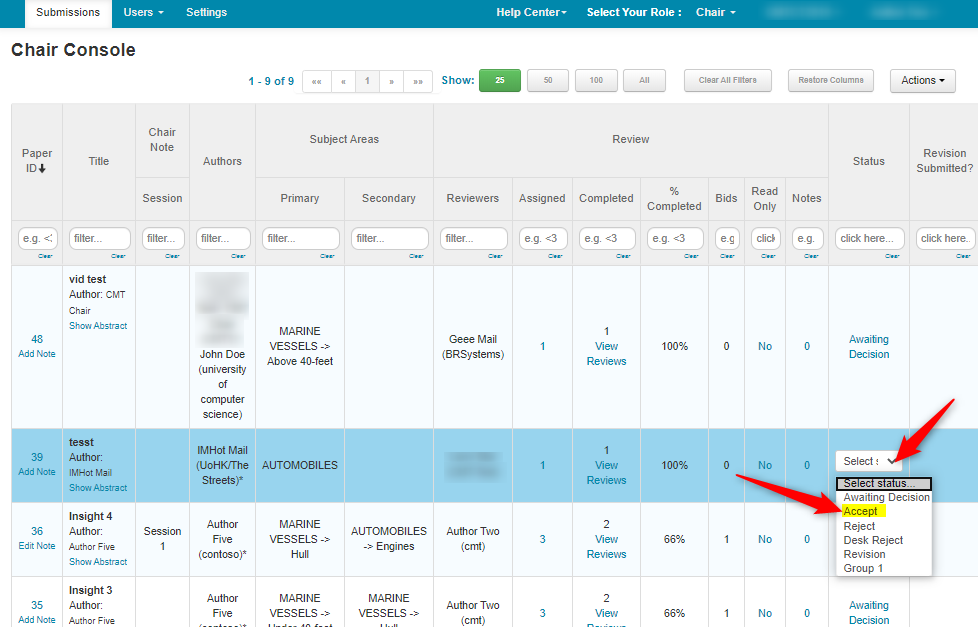
- From the ‘Chair Console’ locate the Submission ID for which the paper status will change. Clicking on the current ‘Status’ link will turn it into a dropdown. Select the correct status for the paper.
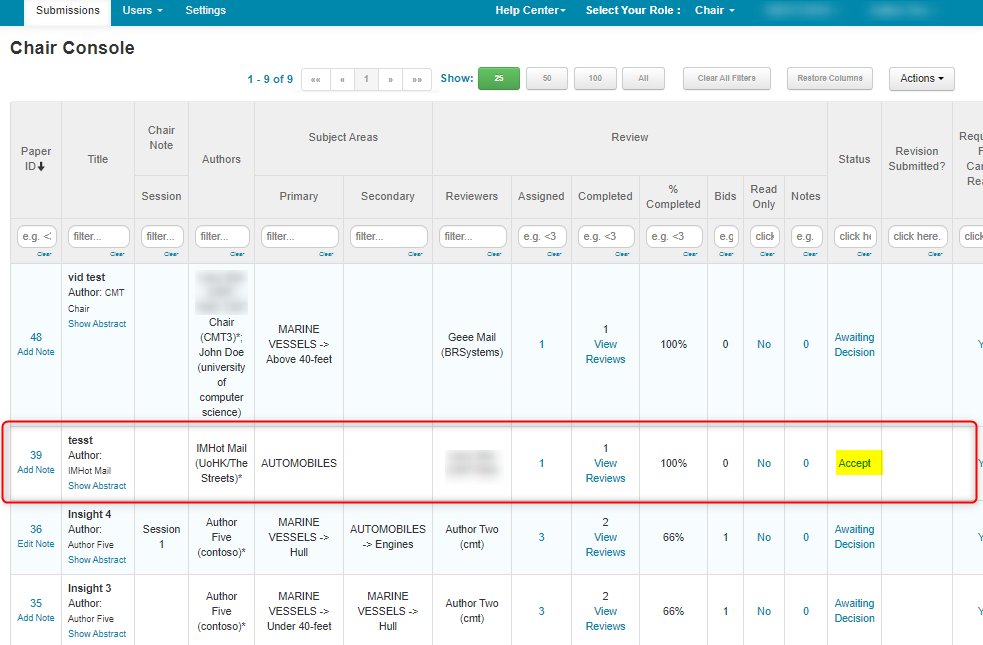
- Verify that the new status appears.
SET SUBMISSION ID PAPER STATUS (BULK EDIT)
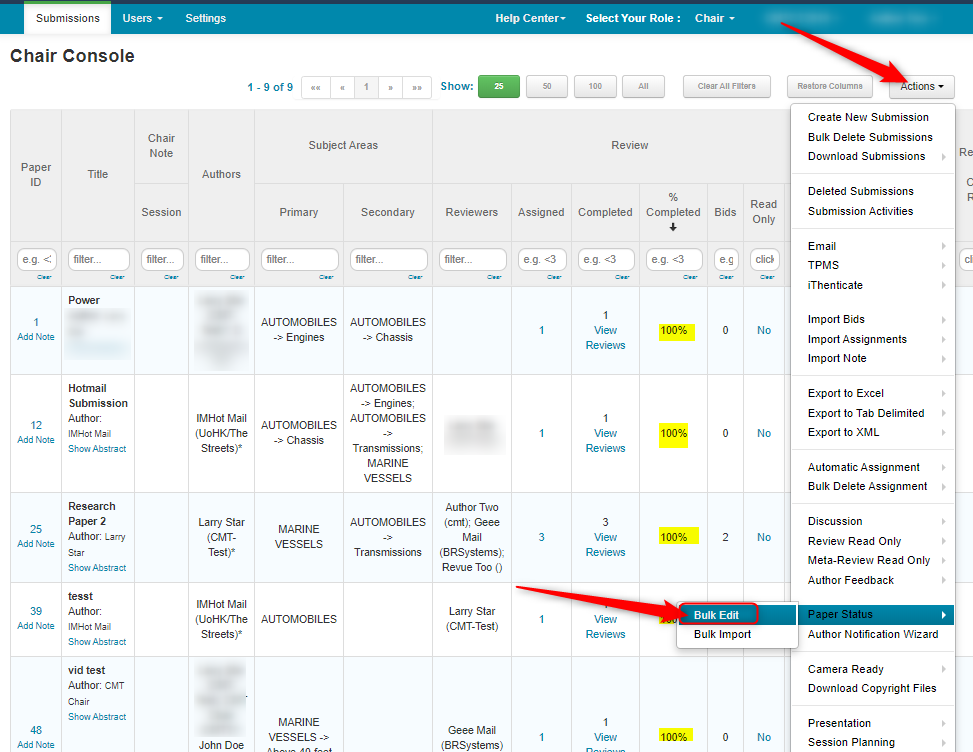
You can change Submission Paper Statuses for one, many or all Submissions. For one or many, filter the Chair Console by all of the Submission IDs that are to be changed to a particular status. If all statuses are to be changed to a single status, then filtering is not necessary. In this example it was filtered by ‘Review Completed %.’
Click on Actions>Paper Status>Bulk Edit
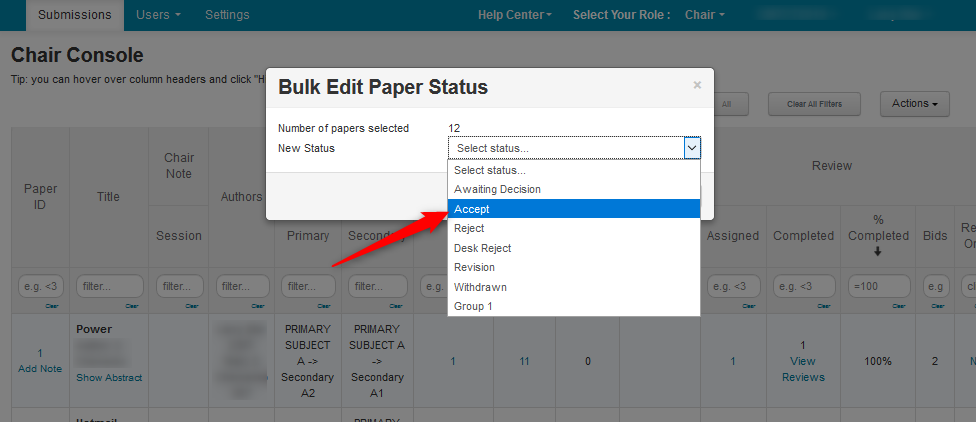
- In the Bulk Edit Paper Status window, click the dropdown and select the status desired. Save the changes.
- Verify the statuses were changed.
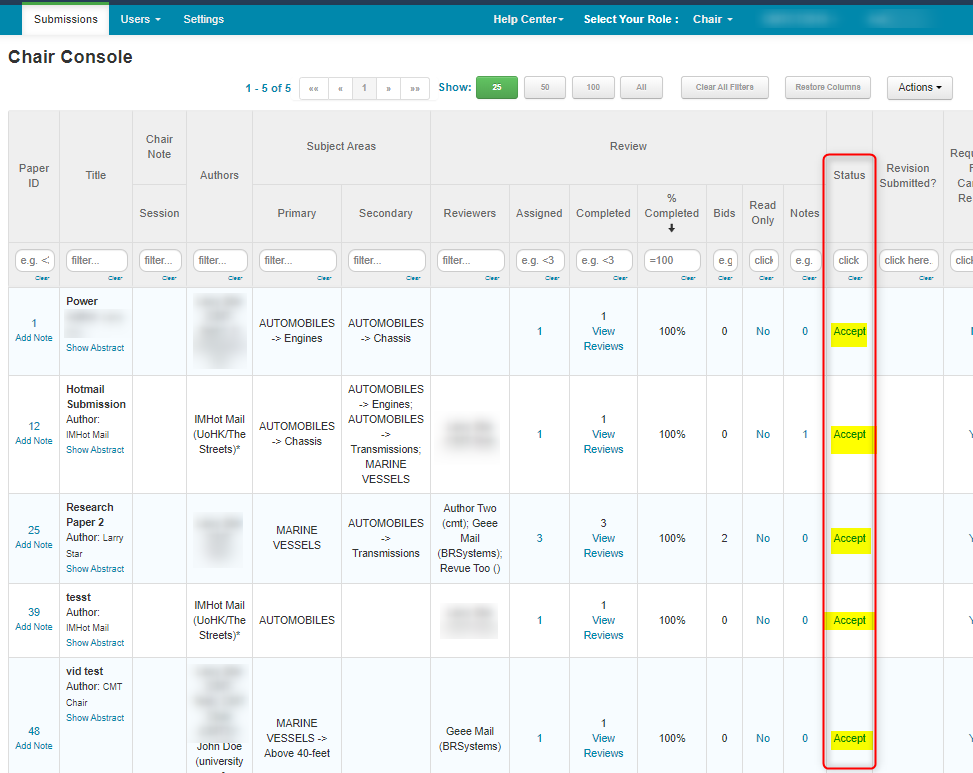
IMPORT PAPER STATUS (BULK IMPORT)
- From the ‘Chair Console’ select Actions>Paper Status>Bulk Import
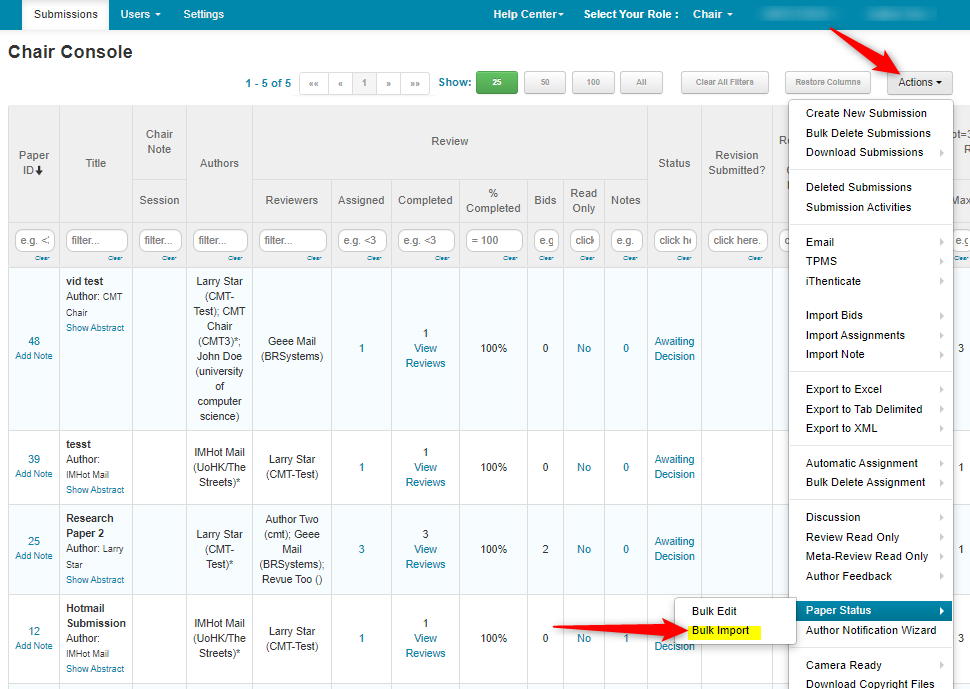
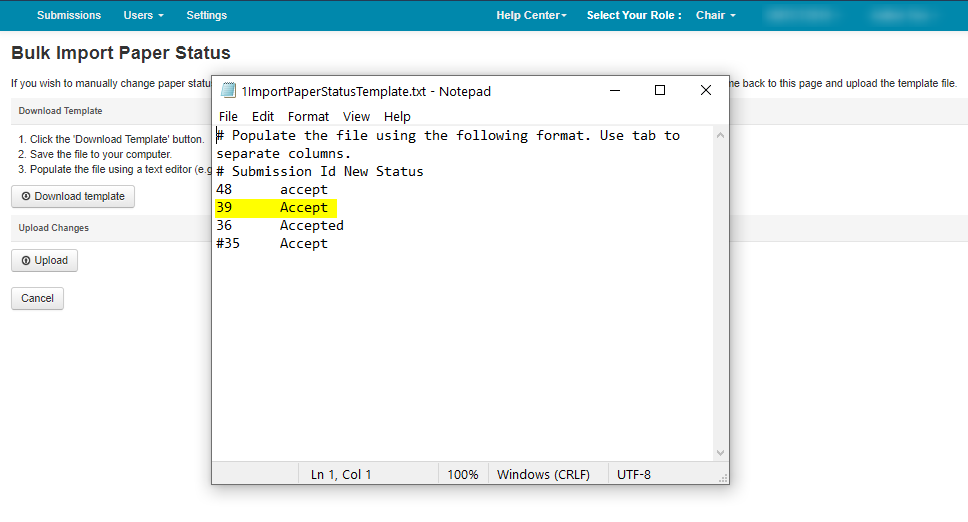
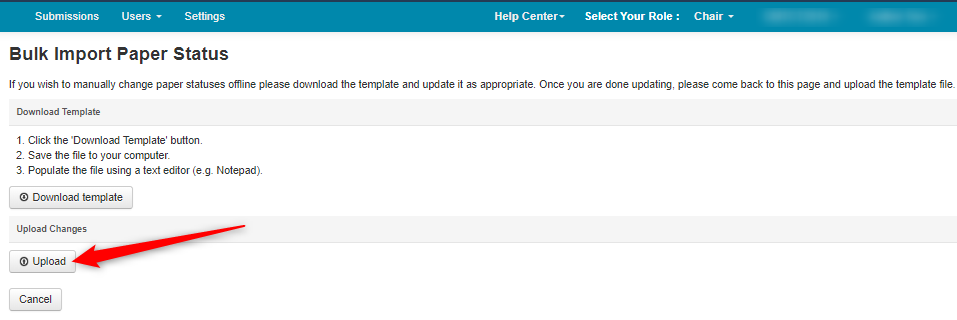
- In the ‘Bulk Import Paper Status’ page, click ‘Download,’ then open the Template and enter the Submission Id followed by the status. Make sure they are tab delimited.
The only statuses that are valid are the ones in the Paper Status setting. Case matters. In the example below, all of the entries are invalid except Submission ID 39.
- Below is the correct way to enter the information.
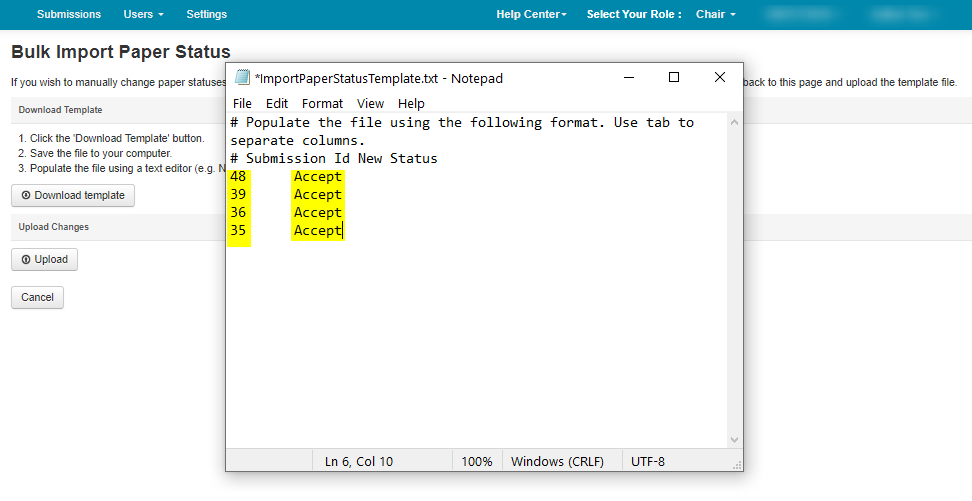
- With the correct file saved, click ‘Upload’ in the ‘Bulk Import Status’ page.
- Verify the results. Click ‘Save Changes.’
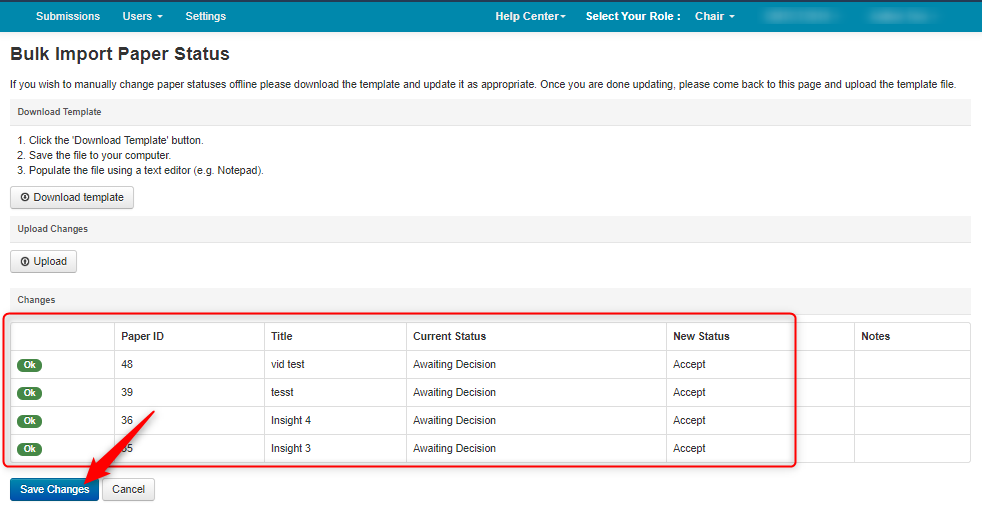
- Verify the statuses changed for those papers.
